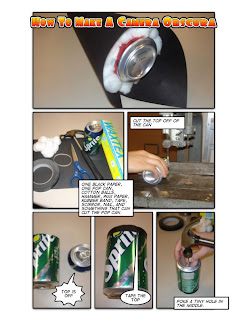
the idea of the camera obscura had been around for centuries, as far back as 300 B.C. where philosophers noted might traveling through small openings and projecting shapes on the ground. In the 10th century, an Arabian scholar wrote about what is essentially a camera obscura, explaining how,
"The image of the sun at the time of the eclipse, unless it is total, demonstrates that when its light passes through a narrow, round hole and is cast on a plane opposite to the hole it takes on the form of a moon-sickle. The image of the sun shows this peculiarity only when the hole is very small. When the hole is enlarged, the picture changes... ."
This is a simple way of describing how the camera works. As light squeezes through a small opening, it is projected back onto a wall or whatever is at the opposite end of the hole. The image is seen upside down and inverted because of the way that light travels. The size of the pinhole determines how sharp the resulting image is. Generally, the smaller the pinhole, the sharper the image, but taking into account the image that is being projected and how far away the scene is from the hole, and how far the wall that is being projected onto is from the hole, a calculation can be done to determine the proper size for the pinhole.
It was around the mid fifteenth, early sixteenth century when the idea of the camera obscura began to be thought of as an aid for drawing. Daniel Barbero, a Venetian man, made this announcement to the public:
"Close all shutters and doors until no light enters the camera except through the lens, and opposite hold a piece of paper, which you move forward and backward until the scene appears in the sharpest detail. There on the paper you will see the whole view as it really is, with its distances, its colours and shadows and motion, the clouds, the water twinkling, the birds flying. By holding the paper steady you can trace the whole perspective with a pen, shade it and delicately colour it from nature."
From about the mid sixteenth century and onward, artists began to use the camera obscura to their benefit, although some thought that it was considered a form of cheating and therefore a disgrace to the art world.
The cameras also became a source of entertainment, small buildings placed in public areas where one could go and sit inside in order to see the image outside "magically" projected for them.

Nowadays, making pinhole cameras and camera obscuras is a fun pastime and do it yourself project for just about anyone, due to its simplicity. It is also an easy way to introduce the basics of photography. Many artists also enjoy the aesthetic look of the pinhole camera and the strange yet tantalizing images that can be produced from projecting a landscape on a wall with the camera obscura, and continue to use them and perfect their technique to make beautiful images.
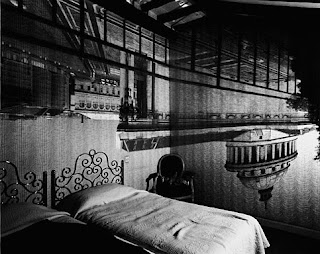
Abelardo Morell does some really amazing lanscape/cityscape camera obscura photography
The cameras also became a source of entertainment, small buildings placed in public areas where one could go and sit inside in order to see the image outside "magically" projected for them.
Nowadays, making pinhole cameras and camera obscuras is a fun pastime and do it yourself project for just about anyone, due to its simplicity. It is also an easy way to introduce the basics of photography. Many artists also enjoy the aesthetic look of the pinhole camera and the strange yet tantalizing images that can be produced from projecting a landscape on a wall with the camera obscura, and continue to use them and perfect their technique to make beautiful images.
Abelardo Morell does some really amazing lanscape/cityscape camera obscura photography
It would be amazing if I had the opportunity to try something like this out this summer while I am in Italy

As for my own camera obscura that I made for class, I unfortunately did not take any pictures of it beforehand, and my photographer boyfriend wanted to experiment with it after class, so it is now mostly in shambles. Aside from that, it was really simple to make and actually worked more successfully than I had expected.
I started out by taking the lens, (really a plastic magnifying glass) and holding it up to my wall with the light from the window shining behind me. By moving the lens back and forth I eventually found that sweet spot where the image of the window and the trees outside was in focus on the wall. I then measured that distance, which came out to be just over three and a half inches.
The lens basically uses refraction to bend the light coming in and focus it in order to form the image on the wall. when using a simple pinhole, it is nearly impossible to get a perfectly in focus image from the pinhole, because although the exact size of the hole can be calculated, the size will always be small and very difficult to perfectly measure, however, the image can appear, although slightly blurry, on a very large surface and still be recognizable. with a lens, there is a much shorter margin for error, and i noticed that people who were slightly off with their depth of field measurement were not able to produce an image at all.
Next, I cut up and taped an old granola bar box and made it so that the open end, where the image would be projected, was three and a half inches from the front of the box, where the lens would be. Next I just cut a hole in the front of the box slightly smaller than the size of the lens, and taped the lens over it. I originally just had a cardboard flap at the back of the box where the image projected, but I wanted it to be easier to see, so I taped part of a white plastic grocery bag over the back which acted as a sort of screen for the image to project onto. It actually worked amazingly well, and was almost perfectly in focus.


No comments:
Post a Comment