Sunday, May 8, 2011

albumen

The albumen process was invented in 1850 by Louis Desire Blanquart-Evrard. It was the first time that producing a print on a paper base from a negative became commercially exploitable. This resulted in its popularity for use as the method for printing the carte de visit, a trend in the mid 19th century of buying and trading small prints of friends, family, and famous persons. The print has a slight gloss which contributed to its appeal and made it unique in comparison to other processes of the time period.

The process involves an emulsion made of egg whites and salt, which the paper is dipped into and then dried. Before exposing, the paper is dipped in a solution of silver nitrate and water which activates the emulsion and allows the paper to become light sensitive. After drying again, the paper can be exposed to UV light with a negative in order to produce the image. The result is a brown colored print.
The fixing process involves Herschels standard fixing method involving solutions of hype and a rinse of water.

My experience: Following the same methods as the traditional recipe calls for, we coated the paper, hung it to dry, activated the emulsion, and exposed the image for a few minutes outside. The final result was a brown image with relatively wide tonality range and a slight gloss. We had trouble with the double coating, so my image only had one coat of albumen which had a less noticeable gloss than some of those that had two coats.
The process is also outlined in a previous blog entry


cyanotype


The cyanotype process was invented by Herschel in 1842, mainly as a means to reproduce notes and diagrams. The process was published as a last minute addition to another larger paper he had written. Herschel came across the process while experimenting and corresponding with a friend, Alfred Smee, a chemical correspondent to the Bank of England who had taken some interest in photography. Originally not very successful because of the limited tonal range and Prussion blue color, the process did not really become as popular until its success in the 20th century.

The process made Anna Atkins somewhat famous and gives her the title as the first female photographer when she used the process to photograph a series of British seaweeds, compiling them into a book entitled British Algae.


The coating solution is made up of two separate solutions which are mixed
Mixing cyanotype chemicals
together before coating the material. Solution A is made up of 25 grams of Ferric ammonium citrate and 100mL of water. Solution B is 10grams of Potassium ferricyanade and 100mL of wawater. Equal quantities of each solution are then mixed together in a third container, but need to be used with about a half hour because the solution does not last very long once mixed.
After evenly coating the paper and allowing it to dry, a negative can be placed over the paper and both should be exposed to UV, light generally natural sunlight. Depending on cloud coverage, number of coats, and the density of the negative, the exposure can take from a few minutes up to an hour. The paper should be exposed until the image looks as if it is getting lighter instead of darker and the blue is starting to fade. This is one of the longer process for exposure.
Fixing the image is as simple as running water of the paper for several minutes until the residual chemicals are removed. This simple fixing method that does not require the use of hypo is another reason for the popularity of the cyanotype.

The cyanotype "became the most commercially successful of all of Herschel's processes; indeed, it is the only process from the first decade of photography to survive in active use well into the twentieth century..." Mostly used for acrchitectural blueprinting, the cyanotype process has become a craft project and exciting way for amateur image makers and everyday creative persons to express themselves using such a cheap and simple method. Cyanotype fabrics with the high contrast of white shapes over the deep blue are a stunning way to transform fabric into a work of art. This set of chair seats and pillow cases is an example of such innovation.


My experience:
After preparing solutions A and B and mixing the two together in a separate container, 100% rag paper was coated with the green colored solution and then allowed to dry. We then applied a second coat and also let it dry.
I had two different negatives so both images were brought outside with the negative ink side facing the coated side of the paper. It was a very sunny day, but the cyanotypes still take a long time to expose so we were outside for about 20 minutes until the blue of the images started to fade.
The images were then fixed by running them under water for about five minutes. I left one image just as was, with only the water fixative:
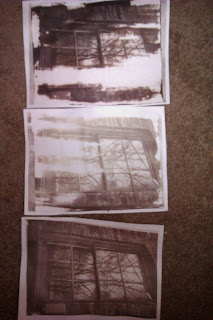
For the other print, and two strips that i cut off of it, I used the other three toning solutions. The first was soaked in a mixture of tea and water, which was supposed to produce a darker blue effect. The strip I put in that solution was already pretty dark blue so it did not really have much of an effect.
I soaked the actual print in the tea solution first, and the strong bleach solution which resulted in a brownish tone, but I did not really like the final result.
The other strip was soaked in the weak ammonia first, and then in the tea solution. This was supposed to result in a blue-yellow tone, but I did not really achieve that result and instead ended up with a faded blue color.


2nd toner, 3rd toner, 1st toner.


Friday, May 6, 2011

Vandyke Brown


The vandyke brown print was invented by Herschel in 1842, getting its name from the print color's similarity to the deep brown pigment painter Van Dyck was known to use. The process is quite simple and is very similar to the first iron-silver process, the argentotype, which was also invented by Herschel and gave him credit for being the first to form an image with an iron sensitizer. "Both utilize the photosensitivity of iron salts as well as the ability of ferrous ions [iron(II)] to reduce silver ions to silver metal." The vandyke process is essentially his perfection of the argentotype.

The formula for the process is as follows:

        Solution A
        Ferric Ammonium Citrate 9.0 gm
        Distilled Water 33.0 ml

        Solution B
        Tartaric Acid 1.5 gm
        Distilled Water 33.0 ml

        Solution C
        Silver Nitrate 3.8 gm
        Distilled Water 33.0 ml

Combine Solutions A and B and slowly add C while stirring. Pour the sensitizer in a brown bottle and let it age for a few days before using. Keep it stored in a dark place. I keep mine in a covered box. I have used sensitizer that had been sitting around for a year or so and it was fine. Care should be taken when mixing.

After evenly coating the paper and allowing it to dry, the negative and coated paper should be exposed in UV light (the sun), depending on cloud coverage, density of the negative, and number of coats of emulsion, this could take only a couple of minutes, or ten to fifteen.

After exposure, the image will darken greatly once it has gone through the fixing process, and will darken even more once it has dried.

Path to Odaru, Kawazu, Izu, 12/26/89"Prints are immersed in water and then checked to make sure that there are no bubbles on the surface. They are then transferred to the reducer and agitated until the desired density is achieved. Reduction seems to be most pronounced in the lighter areas so great care must be taken to avoid wiping out delicate highlight details. This reducer has a tendency to increase overall contrast. After reduction prints are treated in a hypo clearing agent for three minutes and then washed for thirty minutes."

The process is relatively low in cost, making it quite popular, and one can achieve different tones by adding Kodak Polytoner, gold selenium, sepia, berg Copper, or Berg Blue in order to achieve purples, pinks, and blues. Unfortunately the downside to vandyke prints is that they are prone to fading after prolonged exposure to UV light.

"I was first drawn to the Vandyke process when I became dissatisfied with the lack of variety and character of the baryta base of conventional gelatin-silver photographic papers. I wanted to make prints on some of the many beautiful and interesting papers that are available to printmakers and watercolorists and first worked with salted paper but with limited success and considerable frustration."

My experience:

Our solution for coating the paper was mixed beforehand so that it could sit for a few days as the formula calls for. after coating the 100% rag paper once and allowing it to dry, the coated paper was brought outside with the negatives.
I used one cyanotype negative and one salted paper negative. It was an overcast day, so we stayed outside for about fifteen minutes in order to allow the images to properly expose.
We then brought them inside to be fixed, starting with a rinse of water and citric acid for five minutes, running water for about two minutes, a 3% hypo mixture for one minute, and then another minute in another batch, concluding with a final wash in water for about 40 minutes.

The resulting prints were in fact darker once they had dried, and they definitely showed a wider tonal range than some of the other processes, such as cyanotype.


Sunday, April 17, 2011

Photogenic Drawing Salted Paper 2


the salted paper print making process simply involves coating a paper (usually a matte surface) with a mixture of photo-sensitive materials.
"Salted paper can only be contact printed. For this reason a 4x5 or larger negative is usually preferred. A good salted paper print requires a dense negative with good shadow detail. The best negatives are slightly overexposed and overdeveloped. The reason for this is that salted paper has a self-masking printing-out image. This means that the thin areas of the negative quickly darken and block light from reaching the lower layers of emulsion, preventing detail from forming. The result is the shadow areas lose separation the longer they're exposed. Denser shadow areas with more detail will slow down this tendency to self-mask. The masking effect is negligible in the lighter tones."
After Henry Fox Talbot's first successful use of silver chloride photographic paper in 1835, variations to his method soon followed. In 1839 Herschel suggested that instead of fixing the paper with a salt solution, hypo should be used. They found that this change made the prints more successfully stable to light and left the highlights pure while rather than a slightly light purplish color that did not give the most desirable contrast.


In the late 1840's photographers began to notice that although Talbot was using only a salt solution to make his paper, his prints were turning out a more reddish brown color than those of the French photographers. It was later discovered that English paper. like that which Talbot was using, was sized by the manufacturer with a gelatin material. After researching this color change and the gelatin method more carefully, it was found that adding a neutral citrate would also cause a change in the color of the final prints, making them more reddish and brighter.
Later on, starch papers became more popular and nearly wiped out the demand for plain salted papers. Arrowroot paper being the most used, it is a salted paper in which the binding material is a paste that is made from boiled arrowroot starch. The arrowroot produced a richer print and allowed for much more detail.

From Wilson's Cyclopaedic Photography: A Complete Handbook of the Terms, Processes, Formulae and Appliances Available in Photography

Previous to the mid 1850's only matte prints were popular, but soon the use of albumen paper began to grow and there was a rise in demand for glossy prints. Invented in 1850 by Louis Desire Blanquart-Evrard, the method used albumen from egg whites to bind the photographic chemicals to the paper. The process became one of the most popular, and was commonly used for the carte de visite, small 'trading cards' that were popular among friends and often photographs of prominent persons, such as war heros or celebrities, or of themselves.


For our negatives in class, we made three different solutions to coat the paper.
The arrowroot coating consisted of:
4g arrowroot
119mL water
4g NaCl
.5g citric acid

the water was heated and an arrowroot paste (the arrowroot mixed with a small amount of water) was mixed in along with the NaCl and citric acid. It was then allowed to cool
Two pieces of Canson water color paper were coated with two coates of the arrowroot


The gelatin coating recipe was as follows:
125mL water
1g gelatin
2.5g citric acid
2.5 g NaCl

the mixture was heated in a double boiler and two coats were applied warm to two pieces of Canson water color paper.

The albumen was made as a group and consisted of:
500mL egg white
3mL vinegar
7.5g NaCl

after shaking it to a white froth and leaving it for two days until the next class, the albumen was strained through cheese cloth into a glass dish. The papers were folded into "boats" and dipped into the albumen mixture and hung to dry (for one coating) This was done with two pieces of stonehenge 100% rag paper. Another two pieces of the same paper were given a second coating of albumen after drying, being dipped into a alcohol bath, drying again, and then dipped a second time into the albumen. All four papers were left with a glossy finish upon drying, with the double coated papers being the most glossy.

We then used our transparency negatives (because it was too cloudy for the paper ones) to expose the paper. Each paper was first coated with two coats of silver solution in order to activate the photosensitive properties of the coating. we then placed the paper and negative in a frame with the coated side touching the inked side of the transparency, and brought them outside. immediately we were able to see results, but because it was a cloudy day, they took about ten minutes to properly expose.

The papers were then brought inside and fixed with solutions of hypo and a wash.

Arrowroot prints on top and the bottom is gelatin. Top had the most contrast but wasn't coated as well, same with the middle one. Because of this it was hard to distinguish differences in detail.


The previous class we tested the affect of using colored filters on the plain salted paper. Red, Blue, and Yellow cellophane was applied to one paper and the whole page was taken outside to be exposed.

The blue filter let the most light through, exposing the paper and producing a medium brownish color. The red filter blocked most of the light, only allowing it to be slightly exposed. The yellow filter blocked all of the light and left it white.

Saturday, April 16, 2011

Camera Obscura


the idea of the camera obscura had been around for centuries, as far back as 300 B.C. where philosophers noted might traveling through small openings and projecting shapes on the ground. In the 10th century, an Arabian scholar wrote about what is essentially a camera obscura, explaining how,
"The image of the sun at the time of the eclipse, unless it is total, demonstrates that when its light passes through a narrow, round hole and is cast on a plane opposite to the hole it takes on the form of a moon-sickle. The image of the sun shows this peculiarity only when the hole is very small. When the hole is enlarged, the picture changes... ."

This is a simple way of describing how the camera works. As light squeezes through a small opening, it is projected back onto a wall or whatever is at the opposite end of the hole. The image is seen upside down and inverted because of the way that light travels. The size of the pinhole determines how sharp the resulting image is. Generally, the smaller the pinhole, the sharper the image, but taking into account the image that is being projected and how far away the scene is from the hole, and how far the wall that is being projected onto is from the hole, a calculation can be done to determine the proper size for the pinhole.
It was around the mid fifteenth, early sixteenth century when the idea of the camera obscura began to be thought of as an aid for drawing. Daniel Barbero, a Venetian man, made this announcement to the public:


"Close all shutters and doors until no light enters the camera except through the lens, and opposite hold a piece of paper, which you move forward and backward until the scene appears in the sharpest detail. There on the paper you will see the whole view as it really is, with its distances, its colours and shadows and motion, the clouds, the water twinkling, the birds flying. By holding the paper steady you can trace the whole perspective with a pen, shade it and delicately colour it from nature."
From about the mid sixteenth century and onward, artists began to use the camera obscura to their benefit, although some thought that it was considered a form of cheating and therefore a disgrace to the art world.
The cameras also became a source of entertainment, small buildings placed in public areas where one could go and sit inside in order to see the image outside "magically" projected for them.

Nowadays, making pinhole cameras and camera obscuras is a fun pastime and do it yourself project for just about anyone, due to its simplicity. It is also an easy way to introduce the basics of photography. Many artists also enjoy the aesthetic look of the pinhole camera and the strange yet tantalizing images that can be produced from projecting a landscape on a wall with the camera obscura, and continue to use them and perfect their technique to make beautiful images.

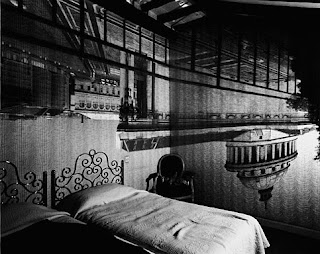
Abelardo Morell does some really amazing lanscape/cityscape camera obscura photography
It would be amazing if I had the opportunity to try something like this out this summer while I am in Italy

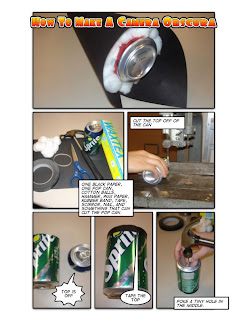
As for my own camera obscura that I made for class, I unfortunately did not take any pictures of it beforehand, and my photographer boyfriend wanted to experiment with it after class, so it is now mostly in shambles. Aside from that, it was really simple to make and actually worked more successfully than I had expected.
I started out by taking the lens, (really a plastic magnifying glass) and holding it up to my wall with the light from the window shining behind me. By moving the lens back and forth I eventually found that sweet spot where the image of the window and the trees outside was in focus on the wall. I then measured that distance, which came out to be just over three and a half inches.
The lens basically uses refraction to bend the light coming in and focus it in order to form the image on the wall. when using a simple pinhole, it is nearly impossible to get a perfectly in focus image from the pinhole, because although the exact size of the hole can be calculated, the size will always be small and very difficult to perfectly measure, however, the image can appear, although slightly blurry, on a very large surface and still be recognizable. with a lens, there is a much shorter margin for error, and i noticed that people who were slightly off with their depth of field measurement were not able to produce an image at all.
Next, I cut up and taped an old granola bar box and made it so that the open end, where the image would be projected, was three and a half inches from the front of the box, where the lens would be. Next I just cut a hole in the front of the box slightly smaller than the size of the lens, and taped the lens over it. I originally just had a cardboard flap at the back of the box where the image projected, but I wanted it to be easier to see, so I taped part of a white plastic grocery bag over the back which acted as a sort of screen for the image to project onto. It actually worked amazingly well, and was almost perfectly in focus.


Saturday, March 26, 2011

Photogenic Drawing


history:
the idea of photogenic drawings originated with Thomas Wedgewood and his experiments done with images on paper and leather sensitized with silver nitrate in 1802.
Photogenic drawing was the name William Henry Fox Talbot gave to his initial photographic invention. As early as 1834, Talbot was making salt prints by placing lace, leaves and other objects on light-sensitive paper and exposing it to the sun. Although Talbot used photogenic drawing paper in the camera, exposures in the camera often took hours, so most photogenic drawings were made by the superposition of objects.
Talbot's success increased over years as he refined his process. He discovered that it worked best if repeated coats of salt and silver nitrate were given to the paper, and if the paper was exposed before the coating dried.Exposure times required were typically an hour or longer, so the process was not suitable for taking portraits.
Two delicate plant fronds


Talbot made no formal announcement of his discoveries until he heard that on January 7 1839, that Daguerre had discovered a way of fixing a photographic image.Talbot reacted immediately and wrote a paper on his process that was presented to the Royal Institution, in London, on 31 January 1839.
Talbot later invented and patented his Tablotype or Calotype process. This negative/positive process, was the forerunner to today's conventional photography. Both the photogenic drawing process and the subsequent calotype process enabled multiple prints to be produced from a single negative.

the process. in a nutshell:
- Soak paper in a weak solution of sodium chloride (salt).

- When dry, sensitise the paper by brushing one side with a strong silver nitrate solution. This causes silver chloride to be formed on the surface of the paper.

- Take the photo while the paper is still wet. An exposure of at least an hour may be needed. This will imprint an image on the paper.

- Remove the paper from the camera and wash it.

- stabilise (or 'fix') the image on the paper by soaking the paper in a strong solution of sodium chloride.

- This produces a negative image on paper.

- Treat a second sheet of paper with salt + silver nitrate, as above.

- Lay the negative created above on top of the newly-coated sheet of paper + expose to light.

- Wait for a positive image to emerge then fix as above.


in class: for our own experiment, we each had one type of paper: 100% rag, bristol, watercolor, sketch, and canvas.
my canvas paper
each piece was cut into four pieces, and we decided to test a low silver, low salt, high silver high salt, low silver high salt, and high silver low salt concentration, on pair on each piece of four, repeating this on each of the five types. we started out with the low silver low salt concentration, 5% of each, and brushed on one layer of each solution after we had taped a piece of each type of paper onto a board.

we used the beading method to spread the solutions, by using the eyedropper to dispense a row of beads of liquid at the top of each piece and then quickly spreading it as evenly as possibly over the surface. Once the board dried, we placed keys and some other miscelaneous objects over the paper and placed it in the light box for seven minutes.

After taking it out we noticed some very slight results. The bristol and rag papers showed a faint outline of where the keys had been. we then soaked the images in the salt solution as a fixer.
Trial One: low silver low salt
This same process was repeated three more times with each of the different pairings of concentrations. The high silver was a 12% concentration while the high salt was 10%

results:
in the end we found that the low silver high salt papers produced no results, and the high silver low salt, high silver high salt papers both produced results with the sketch, rag, water color, and bristol papers. The most successful image was on the sketch paper that had been coated in high silver low salt. we came to the conclusion that the best images resulted from paper that had the lowest concentration of salt. Another thing we had discussed was the paper types and how not only their texture and thickness but also the chemicals in the paper may have played a strong role in the success of the image and the paper's photosensitivity.
Trial 2: low silver high salt (no results)

Trial 3: high silver, low salt (best results)

Trial 4: high silver, high salt (second best results, some clearer than others)